The Ultimate Guide to Converting Shipping Containers
(What you need to know before you start turning steel boxes into stylish spaces)
If you’ve ever walked past a row of rust‑streaked containers stacked on a dock and imagined a sleek office, a cozy tiny home, or a pop‑up café tucked inside, you’re not alone. The global shortage of affordable building material, rising eco‑consciousness, and the allure of industrial chic have turned shipping‑container conversion into a booming niche.
In this post you’ll discover:
- How different container types can be repurposed.
- The practical benefits and hidden challenges.
- A step‑by‑step roadmap to get from raw steel to finished interior.
- A cost‑breakdown table to keep your budget on track.
- Answers to the most common questions that pop up during planning.
All of this is written in a hands‑on, second‑person style so you can picture yourself owning the project from day one to move‑in day.
1. Why Choose a Shipping Container?
| Benefit | What It Means for You |
|---|---|
| Cost‑Effective | A 20‑ft container can be purchased for $1,500‑$3,000, far less than a traditional foundation and framing. |
| Speed of Construction | Modular units can be stacked, welded, and finished in weeks rather than months. |
| Sustainability | Reusing a container saves up to 1,200 tons of steel from entering the landfill per 1,000 units. |
| Mobility | If you need to relocate, the container can be lifted onto a flatbed truck and moved with minimal disassembly. |
| Durability | Designed to withstand ocean storms, containers are weather‑tight, fire‑resistant, and pest‑proof. |
These advantages make containers attractive for tiny homes, micro‑offices, retail kiosks, emergency shelters, and even schools. But the decision isn’t just about dollars; it’s also about how the space will serve your lifestyle or business goals.
2. Types of Containers & Their Typical Uses
| Container Size | External Dimensions (L × W × H) | Typical Applications |
|---|---|---|
| 20‑ft Standard | 20′ × 8′ × 8′ 6″ (6.1 m × 2.44 m × 2.59 m) | Guest houses, pop‑up cafés, storage units |
| 40‑ft Standard | 40′ × 8′ × 8′ 6″ (12.2 m × 2.44 m × 2.59 m) | Small offices, workshops, modular classrooms |
| 40‑ft High‑Cube | 40′ × 8′ × 9′ 6″ (12.2 m × 2.44 m × 2.90 m) | Loft‑style apartments, multi‑room offices |
| 45‑ft High‑Cube | 45′ × 8′ × 9′ 6″ (13.7 m × 2.44 m × 2.90 m) | Larger retail spaces, micro‑hotels |
| Reefer (Refrigerated) | Same as standard but with insulated walls | Cold‑storage restaurants, labs, medical facilities |
Tip: If ceiling height is a priority (e.g., for a loft bed or standing desk), the high‑cube is your best bet. For tighter budgets, the 20‑ft unit still offers ample floor area when combined side‑by‑side.
3. Key Considerations Before You Dive In
- Zoning & Permits – Check with your local planning department. Some municipalities treat container homes as accessory structures, while others require full residential permits.
- Structural Modifications – Cutting windows, doors, or adding openings can weaken the frame. You’ll need a structural engineer to design reinforcement brackets or “sacrificial” sections.
- Insulation & Ventilation – Steel conducts heat and cold. Spray‑foam, rigid board, or insulated panels are common solutions, paired with mechanical ventilation or operable windows.
- Utilities Integration – Plan electrical conduit, plumbing, and HVAC routes early; retrofitting after closing walls can be costly.
- Exterior Finishes – Paint, cladding, or green walls not only improve aesthetics but also protect against corrosion.
- Budget Buffer – Allocate an extra 10‑15 % for unexpected site work, custom fabrications, or permit fees.
4. The Conversion Process – A Step‑by‑Step Checklist
| Phase | Tasks | Why It Matters |
|---|---|---|
| 1️⃣ Planning | • Define purpose & size • Sketch layout (floor plan, elevation) • Obtain permits | Sets realistic expectations and avoids costly redesigns. |
| 2️⃣ Procurement | • Purchase container (inspect for dents, rust) • Order additional steel, insulation, doors, windows | Quality input equals quality output. |
| 3️⃣ Site Preparation | • Level ground, lay foundation pads or concrete piers • Install drainage | Prevents future settling or moisture issues. |
| 4️⃣ Structural Modifications | • Cut openings (use plasma cutter) • Add reinforcement beams & brackets | Maintains structural integrity after cuts. |
| 5️⃣ Insulation & Weatherproofing | • Apply spray‑foam or board insulation • Seal all seams with joint compound and tape | Keeps interior comfortable and energy‑efficient. |
| 6️⃣ Interior Build‑Out | • Frame interior walls (if needed) • Run electrical, plumbing, HVAC • Install flooring, drywall, cabinetry | Turns the shell into a livable space. |
| 7️⃣ Exterior Finishing | • Paint anti‑rust primer + topcoat • Add cladding, awnings, or deck | Improves aesthetics and protects steel. |
| 8️⃣ Final Inspection & Handover | • Obtain occupancy/usage certificate • Conduct walkthrough for punch‑list items | Guarantees safety and compliance. |
Pro tip: When stacking multiple containers, align the corner posts and use a “frame‑in‑frame” welding technique to distribute loads evenly.
5. Sample Budget Breakdown (USD)
| Item | 20‑ft Standard | 40‑ft High‑Cube | Notes |
|---|---|---|---|
| Container purchase | $2,200 | $3,800 | Prices vary by condition & location |
| Foundation (concrete pads) | $1,000 | $1,800 | Includes site grading |
| Structural reinforcement (steel brackets, welding) | $1,200 | $2,300 | Engineer fees included |
| Insulation (spray‑foam, 2‑in) | $1,800 | $3,200 | R‑value ~ R‑30 |
| Windows & doors (custom) | $1,500 | $2,800 | Triple‑pane for energy efficiency |
| Electrical & lighting | $2,000 | $3,500 | Includes wiring, fixtures |
| Plumbing (if any) | $1,200 | $2,200 | Rough‑in only |
| Interior finishes (drywall, flooring) | $2,500 | $4,500 | Mid‑range materials |
| Exterior paint & cladding | $800 | $1,300 | Anti‑corrosion primer |
| Permit & inspection fees | $500 | $800 | Varies by jurisdiction |
| Total Estimated Cost | $14,200 | $25,200 | Approx. $70–$120 per ft² |
Remember: This table is a starting point. Your final number will depend on design complexity, local labor rates, and any specialty features (e.g., solar panels, rooftop deck).
6. Real‑World Inspiration – Quick Wins
- Micro‑Office Hub – Two 40‑ft high‑cubes joined side‑by‑side, each with a glass wall facing a shared courtyard. The interior features an open‑plan desk area, a small conference room, and a kitchenette.
- Tiny Home on Wheels – A single 20‑ft container fitted with a loft bedroom, compact bathroom, and kinetic solar panels on the roof. The entire unit sits on a trailer for easy relocation.
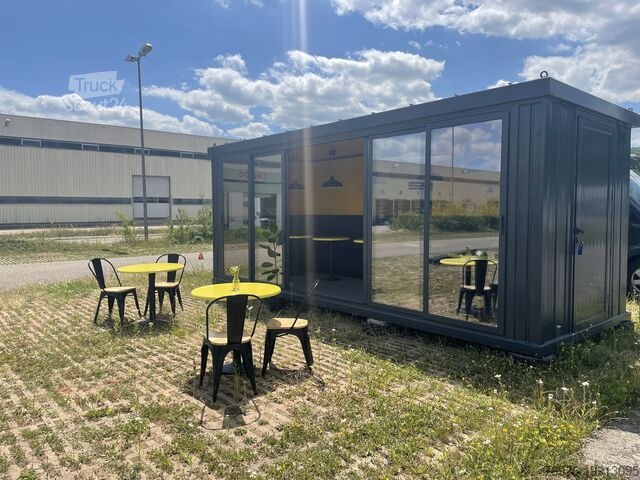
- Pop‑Up Café – A 20‑ft container turned into a coffee shop with an outdoor pergola. The interior uses reclaimed wood shelving and a barista counter made from the container’s own side panels.
All three examples illustrate the flexibility of containers: stack, side‑by‑side, or stand alone—the only limit is your imagination (and local code).
7. Frequently Asked Questions (FAQ)
| Question | Answer |
|---|---|
| Do I need a structural engineer? | If you’re cutting any openings larger than 2 ft × 2 ft, yes. An engineer will design reinforcement plates to keep the container’s load‑bearing capacity. |
| Can I live in a container year‑round? | Absolutely, provided you insulate properly, install a reliable HVAC system, and meet local habitability codes. |
| How long does a conversion take? | A single‑unit conversion (20 ft) typically takes 8–12 weeks from purchase to move‑in, while larger multi‑unit projects can extend to 4–6 months. |
| Is a foundation always required? | Not always. Some owners place containers on steel piles or a pre‑fabricated deck, but most jurisdictions require a permanent footings system for permanent structures. |
| What about rust? | New containers are powder‑coated, but older ones may have corrosion. Clean, sandblast, apply a rust‑inhibiting primer, and finish with a high‑quality marine paint. |
| Can I add a second story? | Yes. Stacking two or more containers is common; just ensure the bottom unit is engineered to support the load and that the combined height complies with zoning limits. |
| Are there financing options? | Some banks treat container homes like traditional construction loans, while others offer specialty “modular” financing. Research local lenders early. |
| Is resale value comparable to conventional homes? | In markets with high demand for unique, affordable housing, container homes can appreciate similarly. However, resale value heavily depends on location, build quality, and local perception. |
8. Common Pitfalls & How to Avoid Them
- Underestimating Insulation Needs – Steel quickly becomes a “heat pipe.” Opt for at least R‑30 insulation in colder climates and consider reflective exterior cladding in hot zones.
- Neglecting Moisture Management – Even a sealed container can trap condensation. Install a vapor barrier, use dehumidifiers, and incorporate operable windows for airflow.
- Skipping Professional Reviews – DIY designs may overlook code requirements. A quick consult with a licensed architect or engineer can save weeks of rework.
- Choosing Low‑Quality Paint – Cheap paint peels faster, exposing steel to rust. Invest in a marine‑grade primer + UV‑resistant topcoat.
- Forgetting Future Expansion – If you might add another unit later, plan utility lines (water, electricity) with extra capacity and modular connections.
9. Your Next Steps – From Idea to Reality
- Define Your Vision – Sketch a rough floor plan, list must‑have features, and set a realistic budget.
- Scout a Site – Check zoning, utilities access, and ground conditions.
- Secure Funding – Whether it’s personal savings, a construction loan, or a crowdfunding campaign, lock in finances before you order the container.
- Hire Professionals – At a minimum, engage a structural engineer and a local contractor familiar with modular builds.
- Order the Container – Choose a reputable supplier, request a thorough inspection report, and arrange delivery logistics.
- Begin the Build – Follow the step‑by‑step checklist above, keeping a project timeline and budget spreadsheet updated weekly.
- Celebrate – Once you receive the occupancy certificate, furnish, personalize, and enjoy the fruits of your steel‑box labor!
10. Closing Thoughts
Converted shipping containers are more than a passing fad; they represent a sustainable, cost‑effective, and versatile building solution that can adapt to any environment—from urban rooftops to remote off‑grid sites. By approaching the project methodically—understanding the types, budgeting accurately, respecting structural limits, and complying with local regulations—you’ll turn a humble steel box into a space that reflects your style, meets your functional needs, and possibly even adds value to your property.
So, are you ready to roll up your sleeves, grab a welding torch, and start sketching the future home or office that only you could imagine? The container is waiting—let’s convert it together.
Happy building!